Edit Links |
LyX /
HebrewOnLinux
<< | Page list | >>
Hebrew, LyX and Linux can work together. Table of contents (hide) 1. Ubuntu 20.04 / Fedora 36 (Xetex)[Added by Guy Sheffer <guysoft at gmail dot com> on 31 May 2020]. Last updated 28 Oct 2022 to add Fedora 36.
# On Ubuntu:
sudo apt install lyx texlive-lang-other texlive-xetex texlive-lang-arabic
# On Fedora:
sudo dnf install lyx gnu-free-{mono,sans,serif}-fonts

2. Pop!_OS 19.10[Added by Yitzchak Schwarz <s.y.schwarz@gmail.com> on 8 Jan 2020] Here's what I did on Pop!_OS 19.10 to get Hebrew working as expected: I installed LyX and texlive-full from the repositories and culmus-latex-0.7 In Tools->Preferences->Editing I set it to use keyboard map with null as primary and hebrew as secondary
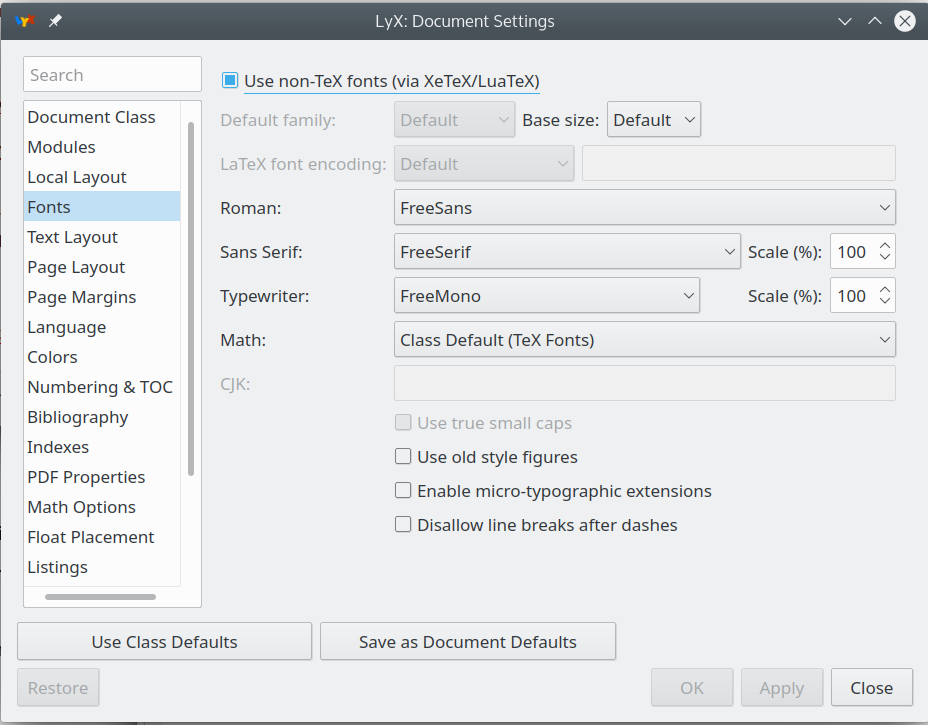
In Document->Settings->Fonts:
Since I like to use sans fonts for everything, I set Default family to Sans Serif. Of course I saved all of the changes I made in Document->Settings as Document Defaults. In order to be able to render my LyX document that I previously created with a different configuration all I had to do was change the fonts. It's also important to note that I need to switch back to the non-Hebrew keyboard layout before creating a math closure to prevent strange artifacts from appearing at the beginning of the math closure when exporting to PDF. 3. Arch LinuxThis method is used with the lyx AUR package, texlive comes along with it. Install the Optional: install the texlive-culmus AUR package for culmus font support. In Document Settings -> Document Class you should have the "Hebrew Article" class available. Switch to it, and also switch the language to Hebrew in Document Settings -> Language. 4. Ubuntu 18.04[Added by Yuri Chernyavsky <yurac777@gmail.com> on 19 Sep 2018] Here is a script that enables hebrew for me. Only need to install fonts from culmus-latex package and set HE8 as the encoding.
 #!/bin/sh

 dTEXMFLOCAL="$(kpsewhich -var-value TEXMFLOCAL)"

 mkdir -p "/tmp/HebrewFonts" &&
 cd "/tmp/HebrewFonts" &&
 wget https://sourceforge.net/projects/ivritex/files/culmus-latex/culmus-latex-0.7/culmus-latex-0.7-r1.tar.gz/download -O culmus-latex-0.7-r1.tar.gz &&
 tar -xvzf culmus-latex-0.7-r1.tar.gz &&
 cd culmus-latex-0.7-r1 &&
 sudo mkdir -p "${dTEXMFLOCAL}" &&
 sudo rsync -a "usr/share/texmf/fonts" "${dTEXMFLOCAL}/" &&
 sudo mktexlsr &&
 sudo updmap-sys --enable Map=culmus.map &&
 (
 echo SUCCESS!!! Need to add the following to your preamble before loading babel:
 echo '\def\HeblatexEncoding{HE8}'
 echo '\def\HeblatexEncodingFile{he8enc}'
 )
5. Method 1 - Ubuntu 12.04+ : Use IvriTeXIf you would like a TeX Live installation with Hebrew support, consider install-tl-ubuntu. It can be run as sudo ./install-tl-ubuntu --hebrew 6. Method 2 - Ubuntu 10.04 (Lucid)A) Install LyX using the synaptic package manager. a. Extract the downloaded file to a folder b. apply "sudo make" via the terminal c. apply "sudo make install" via the terminal D) Launch LyX a. in the Document Class tab (menu on the left side of the window), Set Document Class to "article (Hebrew)". b. in the Language tab (menu on the left side of the window), Set Language to "Hebrew", Set encoding to "other: Hebrew (CP 1255)". F) Go to (Top side menu) Tools -> Preferences -> You can use LyX-keyboard mapping instead of Linux-keyboard mapping for Hebrew.For some people, that is more continent, as you do not have to change keyboard-layout when you switch into math-mode. b. Editing->Keyboard/Mouse -- mark "Use keyboard map" and set the "First" to 'null' and the "Second" to 'hebrew'. c. Editing->Shortcut -- Press on "New" button and in the "Function" field write 'language hebrew", and then set shortcut key as you desire. This key will toggle Hebrew\English. Note: for me, 'language english' worked and 'language hebrew' didn't. See Amir Rachum's Article G) Write some text, Press Ctrl+D, an output file should be generated (if not, some errors will pop up). 7. Method 3 - GeneralNOTE: The last 2 commands are ubuntu 7.04/7.10-specific, but might work on other distros. There are many tutorials, most of them are too old, about how to do that. Some of them cause Hebrew to work, but the generated documents are fuzzy, or just not pretty enough. We recommend this way: (these are Ubuntu oriented instructions, but will probably work on Debian as well)
$ sudo aptitude install culmus culmus-fancy xfonts-efont-unicode xfonts-efont-unicode-ib xfonts-intl-european msttcorefonts
$ sudo make CULMUSDIR=/usr/share/fonts/X11/Type1/ TEXMFDIR=/usr/share/texmf-texlive/
$ sudo make install CULMUSDIR=/usr/share/fonts/X11/Type1/ TEXMFDIR=/usr/share/texmf-texlive/
The last 2 commands are ubuntu 7.04/7.10-specific, but might work on other distros; if not, try to remove the CULMUSDIR=... (until the end of the line) and see if the make recognizes the right directories instead. Now your Hebrew documents should look much better! 8. Problem - Bitmap outputFollowing the instruction in this page I managed to produce hebrew pdf, but with bitmap font (not vector one). After looking at other sites, I found out I had to add "\usepackage{culmus}" (or "\usepackage[use-david]{culmus}" - matter of taste) to the preamble. Perhaps this will help others as well. 8.1 Nikud/VowelsGoing beyond the use of consonants to add Nikud, or vowel points, to Hebrew seems to cause a fair amount of difficulty.
This should remove the errors requesting you activate the combine option. 9. LyX 2.1+ with unicodeIt is fairly simple to get LyX to display and print fully pointed Hebrew with recent versions. (The set up below also allows the use of fully accented polytonic Greek.) This set up requires the use of XeTeX, so ensure that your LyX installation supports this output method first. The use of the Cardo font for the display of Hebrew and Greek is strongly recommended, as it has an extensive character set. See http://scholarsfonts.net/cardofnt.html If you want to use sans serif or monospaced foreign characters, then the installation of FreeSans and FreeMono is recommended. See https://www.gnu.org/software/freefont/ Open Document → Settings. Under the "Fonts" tab, select "Use non-TeX fonts (via XeTeX/LuaTeX)". Select Cardo as the Roman font, FreeSans for Sans Serif, and FreeMono for Typewriter. If using biblatex, you will also need to switch from babel to polyglossia. In the Document → Settings → LaTeX Preamble tab, add:
\usepackage{polyglossia}
\usepackage[style=verbose,natbib=true,citestyle=verbose,backend=biber,url=false,doi=false,isbn=false]{biblatex}
\addbibresource{some.bib}

\newfontfamily\greekfont{BABEL Unicode}
The first line ensures polyglossia is used, instead of babel. The second line uses biblatex for bibliographies, which is much more flexible than bibtex,
The In order for LyX to recognize your new language(s) for the first time:
Once the language has been set up for the first time, it will appear as an item in the Edit menu,
You should now be able to enter both Greek and Hebrew and set the language in LyX. The text will be properly hyphenated.
10. References
11. Categories |