Edit Links |
LyX /
Using LyX for Linguistic Papers
<< | Page list | >>
Using LyX for Linguistic Papers Using LyX for Linguistic Papers Table of contents (hide)
1. LyX and LinguisticsLinguists, as opposed to, say mathematicians, have specific typographic needs, including:
LyX serves these needs pretty well, even if some of the tasks remain demanding. This site documents LyX's linguistic features, describes some workarounds and articulates feature requests for future LyX versions. For general information about using LyX in the Humanities, consult the site HumanitiesLyX, which covers a lot of linguists' needs as well. For general information on LaTeX for linguists please refer to Doug Arnold's LaTeX for linguists page, the UPenn LaTeX page, and Ling-TeX. 2. The Linguistics ModuleAs of version 1.6., LyX features so-called modules that add specific features to your document. LyX also ships a Linguistics module that adds some native support for numbered examples, glosses, OT tableaux and some semantic markup commonly needed by linguists. You can load the module in Document→Settings→Modules. Instructions for this module can be found throughout this site. Additionally, LyX also includes a small manual that demonstrates the features (cf. Help→Specific Manuals→Linguistics Manual). If you have suggestions for features that could be added to this module, don't hesitate to contact the LyX developers list. 3. Phonology/Phonetics3.1 Using LyX to Display Phonetic Characters (IPA)LyX internally uses Unicode. If you are used to working with Unicode fonts such as the SIL Doulos IPA font, you can principally continue entering International Phonetic Alphabet (IPA) symbols in the same way you usually do (for example, using a Keyboard Layout). You can also copy and paste Unicode IPA text from other sources into LyX or insert them via Insert→Special Characters→Symbols.... Such "direct" Unicode input is particularly advised if you're using XeTeX or LuaTeX with "non-TeX fonts". With this specific setting, you can always enter IPA glyphs via unicode directly. You just have to take care to select a font that includes the IPA glyphs, and everything should just work. However, in all other settings (i.e., with "TeX fonts", be it with XeTeX/LuaTeX or traditional LaTeX), direct input has several drawbacks. Read the following section a.) if you are interested in details and technical reasons. If you believe us and/or want to insert good-looking IPA without further ado, just hop to section b.) below. a.) Drawbacks of direct Unicode input with "TeX fonts" and advantages of the dedicated IPA inset
LyX's native IPA support via the dedicated IPA inset cures these issues. Here's why. If "TeX fonts" are used, IPA symbols are produced by means of the TIPA package, LaTeX's standard package for IPA support. This package includes two font families. One has been designed to be used with LaTeX's computer modern family of fonts, the other with times (i.e. mathptmx.sty). Please refer to the voluminous TIPA manual for details. So if you insert a Schwa glyph, LyX will automatically convert this glyph to the respective TIPA macro (\textschwa). LaTeX then typesets the Schwa glyph from the TIPA font. If you insert a normal alphabet glyph (such as b), however, it will be passed to LaTeX literally, so LaTeX typesets the b not from the IPA font, but from the main text font, whatever that may be. LyX's dedicated IPA inset assures that all text uses the IPA font. This cures the font mixing problem. Also, with the dedicated inset, you can additionally use the handy "TIPA shortcut notation" (see below), which is in fact faster than Unicode input once you are used to it. Moreover, the kerning problems described above do not occur with the shortcut notation. Here's the technical explanation: Until version 2.0, when LyX exported the Unicode glyphs to TIPA macros (such as \textschwa), it terminated those macros by braces (i.e., \textschwa{}). LyX did this in order to prevent LaTeX errors. Think of a Schwa followed by a b. Without the braces, this would result in \textschwab (instead of \textschwa{}b), and this would confuse LaTeX, because the command \textschwab does not exist. These braces, however, disturb the kerning. The correct solution would be a blank, i.e. \textschwa b, but this requires a much more complex algorithm. In LyX 2.1, this algorithm finally has been implemented, so the kerning problem is a thing of the past. Nonetheless, the more visible problem 1 (mixing of different fonts) remains. So much for technical details. The following sections describe how to use LyX's dedicated IPA inset. b.) Entering the IPA inset via the Menu The easiest way to start IPA mode is to use the menu entry Insert→Special Characters→Phonetic Symbols, which will bring you to the IPA mode immediately (this menu entry was introduced in LyX 1.4.3). As of LyX 2.1, there is an IPA toolbar which automatically opens when the cursor is inside the IPA inset. This toolbar is ordered by IPA categories and contains all supported glyphs and macros: 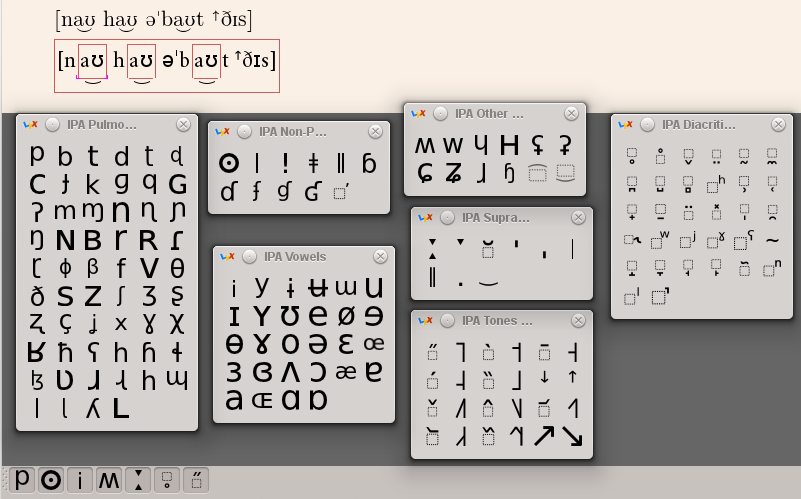
This is probably the most convenient way to enter IPA symbols. Alternatively, you can also enter text directly, using the shortcut characters that TIPA provides (see the appendix of the TIPA manual for a list of all symbols and the corresponding shortcuts):  If the TIPA package has been installed correctly, this text will come out as phonetic notation in the DVI or PDF output. Moreover, as long as LyX's Instant Preview feature is enabled, LyX will display the phonetic text inside LyX as soon as the cursor leaves the math inset. Voil�:  As of LyX 2.0, you can also input or paste Unicode IPA glyphs into the IPA inset. LyX will automatically export them to the correct macros in the output, and no font mixing will occur. Note though, that with LyX versions < 2.1, this has the kerning drawbacks described above. c.) If everything else fails: Using ERT You can also use LyX's LaTeX mode (ERT) to enter any TIPA command. This should not be necessary, since LyX nowadays covers the whole range of supported IPA glyphs (but see d)). Furthermore, you'll lose all the nice features of the native support, most notably Instant Preview, with the ERT approach. d.) Missing symbols In classic LaTeX, that is outside XeTeX/LuaTeX, the following IPA symbol is not supported yet (by the TIPA package, and hence not by LyX):
If you need this symbol, your best bet is to switch to XeTeX or LuaTeX. See this post on stackexchange. 3.2 Tables and Optimality-Theoretic TableauxUnlike some LaTeX editors, LyX allows you to edit tables visually, though its table formatting capabilities are somewhat limited. The most important OT-specific table formatting need is dashed vertical lines – the typical way of showing that two constraints cannot be ranked with respect to each other based on available evidence. Dashed lines are created using the package arydshln. Another need, which is formally somewhat superfluous, is table cell shading – the way to show the violations that are irrelevant to the fate of a candidate. See the LyX wiki page Tables or Help→Embedded Objects for more info about dashed lines and shading. Here are some examples of tableaux:

 Tableaux Floats and List of Tableaux: The Linguistics Module provides a separate float for Tableaux as well as a List of Tableaux (with a separate counter). You can use both the same way as table and figure floats, and find them at the same place (the float in Insert→Floats, the List of Tableaux in Insert→Lists & TOC). Note that the captions are always below the tableau by default, no matter where you put them in the LyX view. To get captions on top, put in preamble \floatstyle{plaintop} \restylefloat{tableau} If your using a KOMA class and the option "tablecaptionsabove", use the following instead for better spacing: \floatstyle{komaabove} \restylefloat{tableau} For LyX < 1.6, you have to create such a float yourself. The procedure is explained in this message to lyx-users. 3.3 Feature Matrices/Stuff in BracketsFor SPE-style feature representations in brackets, go to the Math Panel (Insert→Math→Math Panel) and click on the button to open the delimiter and bracket dialog. Select square brackets from the many available options, and then click on the "insert matrix" button to insert a matrix (basically, a mini-table without grid marks) inside the brackets. You can specify the number of rows and columns inside the matrix in the emerging dialog box. If you need to use the pound sign, #, inside math mode, you must type it in as \#, otherwise LyX will not recognize it as a valid character. If you want the text inside the matrix to not appear in italics, select the line and change it to text mode (see above). 3.4 Other Special Characters and DiacriticsThe Comprehensive LaTeX symbol list by Scott Pakin covers many of the symbols that can be produced with LaTeX. You can insert them in LyX by means of ERT or in math-text mode as described above. Furthermore, LyX supports the direct input of unicode characters as of version 1.5.0 (via Insert→Special Characters→Symbols...) and automatically translates these glyphs to the according LaTeX macro on output (almost the complete list of Pakin and more should be supported). For example, an acute accent on an "a" can be entered
Symbols such as arrows, zero, relations of domination, relative harmony, and so on can be found in the Math Panel. If you need to place a primary/secondary stress (grave/acute accent) or an unstressed/short mark on top of a Greek letter, the easiest way is the Math Panel/Frame Decorations. If you need a pointy hand to mark the winner in your OT tableau, there are several options available in various packages. The bbding package has a nice pointy hand with a cuff, which in ERT is entered as \HandRight. See The Comprehensive LaTeX symbol list for more. If you use math, the pointy hand can be displayed in the LyX workarea via Instant Preview. 4. Using LyX to Draw Trees4.1 PackagesThere are many LaTeX packages available for drawing trees, some are specifically designed for linguistic structure trees. All these can be used with LyX, although the integration differs:
The choice of the package depends on your needs and taste. Here are some pros and cons:
4.2 Structure Tree support as of LyX 2.2.0As of version 2.2, LyX will support the forest package out of the box (via the Linguistics Module). Insert a Structure Tree inset via Insert→Custom Insets and enter the bracket notation (documented in the forest manual). If you use the Preview Inset, you will also get instant preview of the tree: 
You can easily align the nodes of the tree vertically, via the "tier" option: 
Generating roofs is easily possible as well via the "roof" option (or "triangle" in forest versions < 2.0): 
As mentioned above, the package also lets you easily generate movement arrows and other nifty things. It is also possible to generate other kinds of trees (Prosodic Structure Trees, Autosegmental Trees, Right-side-up trees, lattices, OT Hasse trees or even non-linguistic trees and taxonomies) with the forest package and the respective LyX inset. Hasse DiagramsTo draw a simple Hasse diagram with "upside-down" branches, use the grow command inside the tree, and specify the direction to 90 degrees. 

Please refer to the voluminous forest manual for details. 4.3 Structure Trees in LyX < 2.2.0Simple Trees with qTree Install the qTree package and then put \usepackage{qtree} into your preamble. Make sure that Instant Preview is activated. Then hit \Tree[.S [.N This ] [.V is ] [.NP [.Det a ] [.N test ] ] ]
After the cursor has left the inset, the tree should be displayed inside LyX:  Alternatively, you can write the text outside math mode, select it, and hit If the branches of the tree vanish in your preview, you are facing a bug in dvipng, the converter used by Instant Preview to generate the preview images for LyX. The bug has been reported to the dvipng developer and he has fixed it for the upcoming version 2.0 of dvipng. So watch out for dvipng >= 2.0 and upgrade to that. Roofs (qTree) Roofs (for complex phrases) can be inserted with the \qroof command. In LyX, you can insert this by typing \qroof{ at the appropriate place in the formula. As soon as you have typed the curly bracket, a new subinset is created:  There you can type the phrase inside this sub-inset, which is then marked as follows.  Here's the Instant Preview display after the cursor left the inset:  Glosses (qTree) To put glosses under the nodes of a tree, you have to fool the Math Editor. In qtree, this can be done with the linebreak command \\, but the math editor does not accept that. So put in the preamble: \renewcommand{\breaknode}{\\}
Then you can do: \Tree[.S [.N Das\breaknode This ] [.V ist\breaknode is ] [.NP [.Det ein\breaknode a ] [.N Versuch\breaknode test ] ] ]
This also works inside qroofs. Prosodic Structure Trees/Greek Symbols in Trees (qTree) If you want to include Greek letters such as sigma for syllable nodes or mu for morae, you have to enter math-math mode (embraced in $...$) while keeping the tree in math-text mode. The greek symbols must then be entered in LaTeX code, which requires putting them between dollar signs, as in: \Tree [.$\sigma$ $\mu$ $\mu$ ]
Instead of manually inserting the dollar signs, you can also switch to math-math mode before entering the Greek letters by pressing again This will produce a simple syllable (sigma) branching into two morae (mu), viewable via Instant Preview inside LyX. Autosegmental trees (qTree, xyLing) For simple feature-sharing trees, [\Tree {\K{[back]} \B{d}\Bdash{dr} \\ \K{V} & \K{V}}]
[\Tree{\K{[back]} \D\Bdash{dr}\Bdash{drr} \\ \K{V} & \K{V} & \K{V}\B{d} \\ & & \K{[-low]}}]
 To do autosegmental delinking, you need  "Right-side-up" trees, lattices, OT Hasse trees (ranking diagrams) The package 4.4 Numbering of structure trees with their own counterTo number trees with their own counter, write the following code in Document → Preferences → LaTeX preamble: \newcounter{tree} \setcounter{tree}{1} \newcommand\tree{(\arabic{tree})} An ERT is now inserted in front of the structure tree, where the command \tree is written. The number appears at the left edge of the text. If the tree is to be indented, this can be done with Insert → Formatting → Horizontal distance. You can also insert a mark with Insert → Mark, which can be referenced with Insert → Cross-reference in the text. 5. Using LyX to display numbered examples with covingtonThe package covington provides several useful features for linguistics. One of the most convenient one is a sequentially numbered environment that can span several sections. Your numbered examples will look as follows:  The package provides the environments 5.1 Covington environment support in LyXLoad the Linguistics Module and you will find styles for This will make every covington-numbered example display in blue font but without a number; the document will typeset in a normal way and you can cross-reference covington-numbered examples in the text as usual (by inserting a label and a cross reference). This is how your screen will look for the covington example above:  5.2 Adjusting Covington ExamplesCovington's example style is aimed at typical use, which means that it needs to be adjusted for specific uses. Here are some advises how to do that in Q/A form.
Up to LyX 2.1, place [(whatever)] in TeX mode at the very beginning of the subexample. As of LyX 2.2, use Insert→Custom Numbering. If you want to change the numbering globally, add to Document→Settings→Preamble: \renewcommand*\covsubexnumber[1]{(#1)}
with (#1) changed to whatever you want the numbering to look like (#1 represents the number).
Covington provides two lengths, \examplenumbersep and \subexamplenumbersep, both preset to 0pt. You can increase the indentation by adding a positive length, decrease it by adding a negative length, as follows in the preamble:
\setlength{\examplenumbersep}{-0.5em}
\setlength{\subexamplenumbersep}{0.5em}
Covington (mis)uses LaTeX's equation counter, so you need to adjust this counter in your preamble as follows:
% use package remreset to omit counter resetting on new chapter \usepackage{remreset} \@removefromreset{equation}{chapter} % redefine equation counter (do not prepend chapter number) \renewcommand{\theequation}{\arabic{equation}}
Add to Document→Settings→Document Class→Class Options→Custom: owncounter
This is described in the Linguistics manual distributed with LyX (as of version 2.5.0).
If you are using a table (e.g. an OT tableau) as the content of an example, the default is for the example number to align vertically with the center of the table if no title/comment is included before it within the example. To adjust this so that the example number is by the top of the table, enter the "Table Settings" dialogue and, in the "Table-wide settings" box, change the "Vertical alignment" setting to "Top".
6. Interlinear Glosses (Covington)Often linguists need to have a list of examples which are glossed word by word. A great package for this is, again, covington. Up to LyX 2.1, the Linguistics Module only provides some basic support for covington glosses, that is, you still needed LaTeX syntax, particularly for foreign languages and scripts (including IPA). LyX 2.2 introduced a rewritten Glosse support that gets rid of the shortcomings of the original implementation. It lets you insert and format normal text just like outside the Glosse environments. This implementation features a dedicated "translation" subinset (via Insert→Glosse Translation) and an inset for grouping words (via Edit→Text Style→GroupGlossedWords): 
Generally, glosses are inserted as follows (in all versions of LyX): After you have loaded the module, you will find two insets "Glosse" and "Tri-Glosse" in Insert→Custom Insets. As the screenshot above shows, a sentence and its glossed translation are input into the inset, just as two consecutive lines (for Tri-Glosse, that are obviously three). Up to LyX 2.1, the last line – the mandatory (grammatically well-formed) translation – must be preceded by \glt (not in ERT, just verbatim): 
As of LyX 2.2, this is no longer necessary and not even possible (instead, use the sub-inset described above). The last example also shows how you can number the glosses: Just put the Glosse inset into an "Examples" paragraph. The PDF output, then, looks as follows: 
Note: If you open old documents with LyX 2.2, they will be converted and the old Glosse insets will be automatically transformed to the new format. Within this process, however, all Glosse text will be wrapped into TeX mode insets. This is necessary since, in the old format, text was handled "verbatim", i.e. like in TeX mode. You can dissolve those insets, but you need to take care about verbatim commands, which need to be replaced by normal text input manually (alternatively, you can simply proceed with the TeX mode, which should work as expected). 7. Using covington (glosses and examples) in a beamer presentationIf you want to use glosses in beamer, you need to put it in a "fragile" frame. Note further that previous versions of covington (prior to version 1.1) and the beamer class do not work together out of the box, since they both try to define the commands \example and \examples. These versions of covington trigger a LaTeX error due to this command clash. This can be worked around by the following code in Document → Settings → Local Layout:
Provides covington 1
AddToPreamble
  \let\example\relax
  \let\endexample\relax
  \let\examples\relax
  \let\endexamples\relax
  \usepackage{covington}
EndPreamble
This effectively defuncts beamer's example(s) environment in favour of covington's. In recent versions of covington (as of v. 1.1), and as of LyX 2.2.1, this problem is fixed. See LyX's linguistics manual for further tips and tricks. 8. Semantics8.1 MarkupThe Linguistics Module that ships with LyX provides some semantic markup for "expression" (emphasized by default), "concept" (small caps by default) and "meaning" (enquoted by single quotes by default). The definitions can be changed in the preamble. 8.2 Logical SemanticsFortunately, the logical semantics notation is pretty much covered by LyX's math mode. So if you want to insert logical semantic notation, do as if you would want to insert a math formula. You'll find most of the required symbols in the Math Panel (Insert→Math→Math Panel). If you are a bit familiar with the LaTeX notation of that symbols, you can enter them directly into the formula. LyX will convert them for you. With Instant Preview enabled, you'll even get a WYSIWYG display in LyX. 8.3 Other stuffThere are packages available for other semantic needs:
9. Conversation AnalysisIn Conversation Analysis, turns need to be aligned horizontally in order to mark overlaps, turn takings, etc. LyX does not allow multiple blanks and does not have a tabulator, so this cannot be easily done in the normal text environment. However, the alignment can be managed quite well either with LaTeX's 9.1 CA transcription with
|